Getting Started with Microsoft SQL 2019 Big Data clusters
Microsoft latest SQL Server 2019 (preview) comes in a new version, the SQL Server 2019 Big Data cluster (BDC). There are a couple of cool things about the BDC version: (1) it runs on Kubernetes (2) it integrates a sharded SQL engine (3) it integrates HDFS (a distributed file storage) (4) it integrates Spark (a distributed compute engine) (5) and both services Spark and HDFS run behind an Apache Knox Gateway (HTTPS application gateway for Hadoop).
On top, using Polybase you can connect to many different external data sources such as MongoDB, Oracle, Teradata, SAP Hana, and many more. Hence, SQL Server 2019 Big Data cluster (BDC) is a scalable, performant and maintainable SQL platform, Data Warehouse, Data Lake and Data Science platform without compromising cloud and on-premise. In this blog post I want to give you a quick start tutorial into SQL 2019 Big Data clusters (BDC) and show you how to set it up on Azure Kubernetes Services (AKS), upload some data to HDFS and access the data from SQL and Spark.
SQL Server 2019 Big Data cluster (BDC)
SQL Server 2019 Big Data cluster (BDC) is one of the most exciting pieces of technologies I have seen in a long time. Here is why.
](/images/sql2019/SQL-Server-2019-big-data-cluster.png)
Kubernetes
SQL Server 2019 builds on a new abstraction layer called Platform Abstraction Layer (PAL) which let’s you run SQL Server on multiple platforms and environments, such as Windows, Linux, and Containers. To take this one step further, we can run SQL Server clusters entirely within Kubernetes - either locally (e.g. on Minikube), on on-premise clusters or in the cloud (e.g. on Azure Kubernetes Services). All data is persisted using Persistent Volumes. To facilitate operations, there is a new mssqlctl command to scaffold, configure, and scale SQL Server 2019 clusters in Kubernetes.
SQL Master Instance
If you deploy SQL Server 2019 as a cluster in Kubernetes, it comes with a SQL Master Instance and multiple SQL engine compute and storage shards. The great thing about the Master Instance is that it is just a normal SQL instance - you can use all existing tooling, code, etc. and interact with the SQL Server cluster as if it was a single DB instance. If you stream data to the cluster, you can stream the data directly to the SQL shards without going through the Master Instance. This gives you optimal throughput performance.
Polybase
You might know Polybase from SQL Server 2016 as a service that let’s you connect to flat HDFS data sources. With SQL Server 2019, you can now as well connect to relational data sources (e.g. Oracle, Teradata, SAP Hana, etc.) or NoSQL data sources (e.g. Mongo DB, Cosmos DB, etc.) as well as using Polybase and external tables - both with predicate pushdown filters. It’s a fantastic feature turning your SQL Server 2019 cluster into your central data hub.
HDFS
Now comes the fun part. When you deploy a SQL Server 2019 BDC, you also deploy an Hadoop Distributed Filesystem (HDFS) within Kubernetes. With the tiered storage feature in HDFS you can as well mount existing HDFS clusters into the integrated SQL Server 2019 HDFS. Using the integrated Polybase scale-out groups you can efficiently access this distributed data from SQL with external tables. If you install SQL Server 2019 as a BDC, all the configurations of those services is done automatically, even pass-through authentication. These features allows your SQL Server 2019 cluster to become the central data storage for both relational structured and massive volumes of flat unstructured data.
Spark
And it’s getting better. The SQL Server 2019 BDC also includes a Spark run-time co-located with the HDFS data pools. For me - coming from a Big Data background - this is huge! This means, you can take advantage of all Spark features (SparkSQL, Dataframes, MLlib for machine learning, GraphX for graph processing, Structured Streaming for stream processing, and much more) directly within your SQL cluster. Now, your SQL 2019 cluster can as well be used by your data scientists and data engineers as a central Big Data hub. Thanks to integration of Apache Livy (a Spark Rest Gateway) you can utilize this functionality with your existing tooling, such as Jupyter or Zeppelin notebooks out-of-the-box.
Much More … (Knox, Grafana, SSIS, Report Server, etc.)
Once we are running in Kubernetes, you can as well add many more services to the cluster and manage, operate, and scale them together. The Spark and HDFS functionality is configured with an Apache Knox Gateway (HTTPS application gateway for Hadoop) and can be integrated into many other existing services (e.g. processes writing to HDFS, etc.). SQL Server 2019 BDC ships comes with an integrated Cluster Configuration portal and a Grafana dashboard for monitoring all relevant service metrics.
Deploying other co-located services to the same Kubernetes cluster becomes quite easy. Services such as Integration Services, Analysis Services or Report Server can simply be deployed and scaled to the same SQL Server 2019 cluster as additional Kubernetes pods.
Another cool feature of SQL Server 2019 worth mentioning is that along Python and R it will also support User Defined Functions (UDFs) written in Java. Niels Berglund has many examples in his Blog post series.
Installation
Currently, SQL Server 2019 and SQL Server 2019 Big data cluster (BDC) are still in private preview. Hence, you need to apply for the Early Adoption Program which will grant you access to Microsoft’s private registry and SQL Server 2019 images. You are also assigned a buddy (a PM on the SQL Server 2019 team) as well as granted access to a private Teams channel. Hence, if you want to try it already today, you should definitely sign up!
In this section we will go through the prerequisites and installation process as documented in the SQL Server 2019 installation guidelines for Big Data analytics. In the documentation, you will find a link to a Python script that allows you to spin up SQL 2019 on Azure Kubernetes Services (AKS).
If you want to install SQL Server 2019 BDC on your on-premise Kubernetes cluster, you can follow the steps in Christopher Adkin’s Blog. You can find an official deployment guide for BDC on Minikube in the Microsoft docs.
Prerequisites: Kubernetes and MSSQL clients
To deploy a SQL Server 2019 Big Data cluster (BDC) on Azure Kubernetes Services (AKS), you need the following tools installed. For this tutorial, I installed all these tools on Ubuntu 18.04 LTS on WSL (Windows Subsystem for Linux).
To avoid any problems with Kubernetes APIs, it’s best to install the same kubectl version as the Kubernetes version on AKS. In the SQL Server 2019 docs, the version 1.12.6 is recommended. Hence, in this case we also install the Kubernetes 1.12.6 client.
sudo apt-get update && sudo apt-get install -y apt-transport-https
curl -s https://packages.cloud.google.com/apt/doc/apt-key.gpg | sudo apt-key add -
echo "deb https://apt.kubernetes.io/ kubernetes-xenial main" | sudo tee -a /etc/apt/sources.list.d/kubernetes.list
sudo apt-get update
sudo apt-get install -y kubectl=1.12.6-00
The mssqlctl tool is a handy command-line utility that allows you to create and manage SQL Server 2019 Big Data cluster installations. You can install it using pip with the following command:
$ pip3 install -r https://private-repo.microsoft.com/python/ctp-2.4/mssqlctl/requirements.txt
Before you continue, make sure that both kubectl and mssqlctl commands are available. If they are not, you might restart the current bash session.
Prerequisites: Azure Data Studio
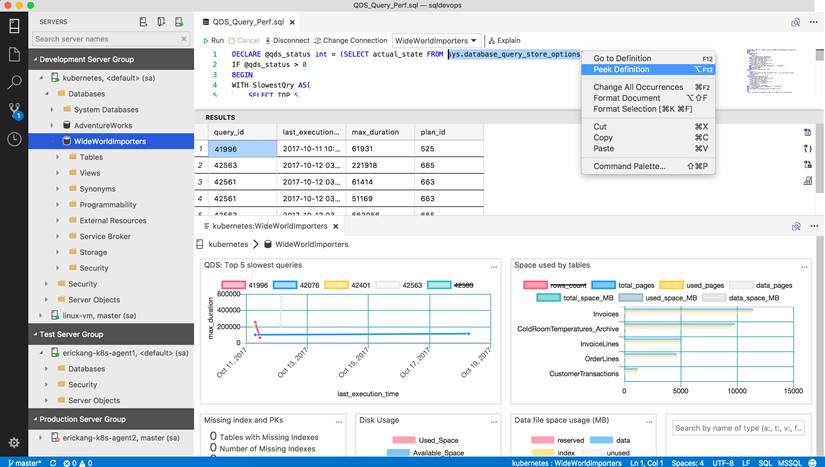
Azure Data Studio is a cross-platform management tool for Microsoft databases. It’s like SQL Server Management Studio on top of the popular VS Code editor engine, a rich T-SQL editor with IntelliSense and Plugin support. Currently, it’s the easiest way to connect to the different SQL Server 2019 endpoints (SQL, HDFS, and Spark). To do so, you need to install Data Studio and the SQL Server 2019 extension.
The following screenshot (Source: Microsoft/azuredatastudio) shows an overview of Azure Data Studio and its capabilities.

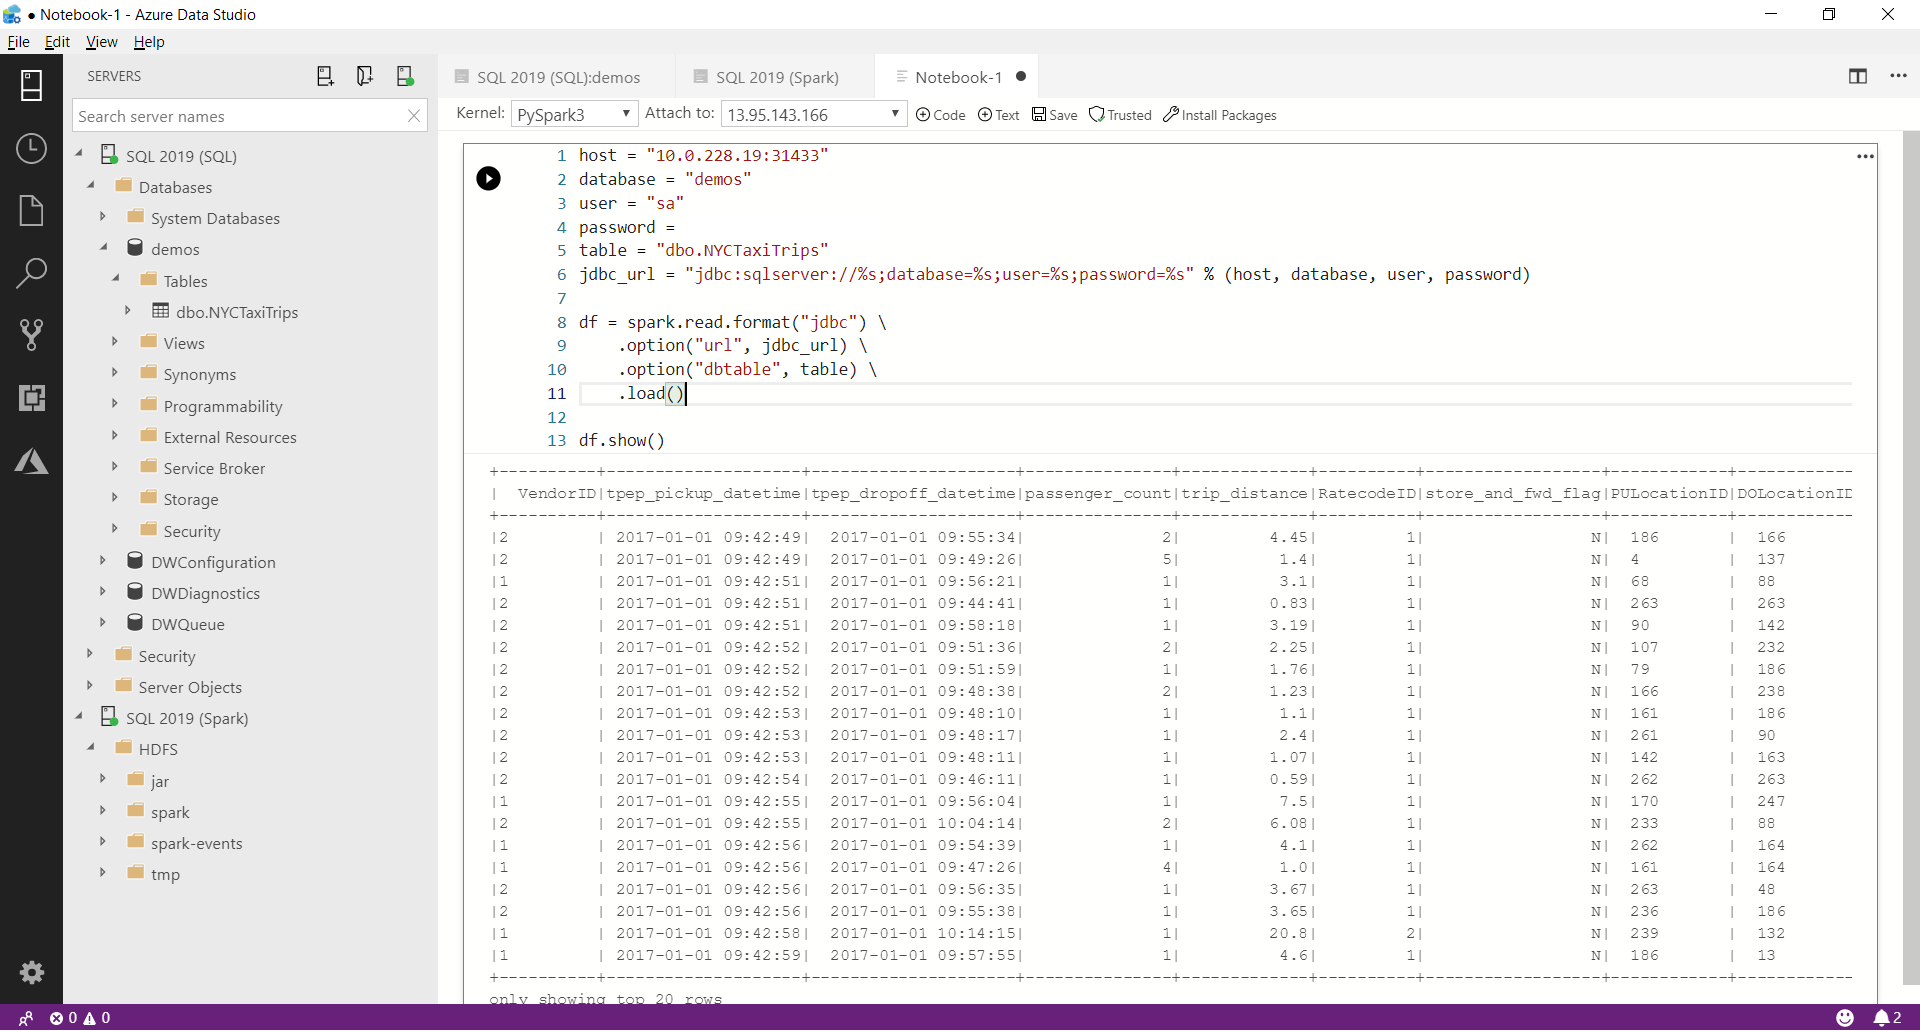
Azure Data Studio also supports Jupyter-style notebooks for T-SQL and Spark. The following screenshot shows Data Studio with the notebooks extension.

Install SQL Server 2019 BDC on Azure Kubernetes Services (AKS)
In this section, we will follow the steps from the installation script in order to install SQL Server 2019 for Big Data on AKS. I will give you a bit more details and explanation about the executed steps. If you just want to install SQL Server 2019 for Big Data, you can as well just use the script.
First, we start setting all required parameters for the installation process. For the docker username and password, please use the credentials provided in the Early Adoption program. These will give you access to Microsoft’s internal registry with the latest SQL Server 2019 images.
Please note that during the Early Adoption phase you will have to enter your docker credentials for the private Microsoft registry. You will receive these credentials after registering for the SQL Server Early Adoption program.
# Provide your Azure subscription ID
SUBSCRIPTION_ID="***"
# Provide Azure resource group name to be created
GROUP_NAME="demos.sql2019"

# Provide Azure region
AZURE_REGION="westeurope"
# Provide VM size for the AKS cluster
VM_SIZE="Standard_L4s"
# Provide number of worker nodes for AKS cluster
AKS_NODE_COUNT="3"
# Provide supported Kubernetes version
KUBERNETES_VERSION="1.12.7"

# This is both Kubernetes cluster name and SQL Big Data cluster name
# Provide name of AKS cluster and SQL big data cluster
CLUSTER_NAME="sqlbigdata"
# Provide username to be used for Controller user
CONTROLLER_USERNAME="admin"
# This password will be use for Controller user, Knox user and SQL Server Master SA accounts
# Provide password to be used for Controller user, Knox user and SQL Server Master SA accounts
PASSWORD="MySQLBigData2019"
CONTROLLER_PASSWORD="$PASSWORD"
MSSQL_SA_PASSWORD="$PASSWORD"
KNOX_PASSWORD="$PASSWORD"

# Private Microsoft registry
DOCKER_REGISTRY="private-repo.microsoft.com"
DOCKER_REPOSITORY="mssql-private-preview"
# if brave choose "latest"
DOCKER_IMAGE_TAG="ctp2.4"
DOCKER_IMAGE_POLICY="IfNotPresent"

# Provide your Docker username and email
DOCKER_USERNAME="***"
DOCKER_EMAIL="***"
# Provide your Docker password
DOCKER_PASSWORD="***"
DOCKER_PRIVATE_REGISTRY="1"

# aks | minikube | kubernetes
CLUSTER_PLATFORM="aks"
ACCEPT_EULA="Y"
STORAGE_SIZE="10Gi"
First, let’s create a new resource group.
$ az group create --subscription $SUBSCRIPTION_ID --location $AZURE_REGION \
    --name $GROUP_NAME
Now, we can go ahead and create the AKS cluster.
$ az aks create --subscription $SUBSCRIPTION_ID --location $AZURE_REGION \
    --name $CLUSTER_NAME --resource-group $GROUP_NAME \
    --generate-ssh-keys --node-vm-size $VM_SIZE \
    --node-count $AKS_NODE_COUNT --kubernetes-version $KUBERNETES_VERSION
If your code fails at this point, the selected Kubernetes version might not be supported in your region. You can check which versions are supported using the following command.
$ az aks get-versions --location $AZURE_REGION --output table
Please note, if you have problems with the aks command creating the Service Principal in your Azure Active Directory (like for Microsoft employees), you can as well create the principal manually beforehand:
$ az ad sp create-for-rbac --name $CLUSTER_NAME --skip-assignment
{
  "appId": "***",
  "displayName": "***",
  "name": "http://***",
  "password": "***",
  "tenant": "***"
}

# assign appId and password values
$ SP_APP_ID = "<app_id>"
$ SP_PASSWORD = "<password>"

$ az aks create --subscription $SUBSCRIPTION_ID --location $AZURE_REGION \
    --name $CLUSTER_NAME --resource-group $GROUP_NAME \
    --generate-ssh-keys --node-vm-size $VM_SIZE \
    --node-count $AKS_NODE_COUNT --kubernetes-version $KUBERNETES_VERSION \
    --service-principal $SP_APP_ID --client-secret $SP_PASSWORD
In the next step, we retrieve the credentials for the cluster. This will register the credentials in the kubectl config.
$ az aks get-credentials --name $CLUSTER_NAME --resource-group $GROUP_NAME --admin --overwrite-existing
In order to access the Kubernetes dashboard, we also need to create a role binding. I took this line from Pascal Naber’s blog post.
$ kubectl create clusterrolebinding kubernetes-dashboard -n kube-system \
    --clusterrole=cluster-admin --serviceaccount=kube-system:kubernetes-dashboard
Next, we can open the Kuerbenetes dashboard for the newly created AKS cluster and see if everything looks fine. To do so, we can forward the required ports to localhost.
$ az aks browse --resource-group $GROUP_NAME --name $CLUSTER_NAME
The Kubernetes dashboard should now be available via http://localhost:8001. I recommend you to open it and take a look at your newly created cluster.
Finally, we can deploy SQL Server 2019 BDC on the Kubernetes cluster using the mssqlctl command-line utility.
$ mssqlctl cluster create --name $CLUSTER_NAME
Great, that was it! You are now ready to get started. The following figure shows the Kubernetes dashboard with an installed instance of SQL Server 2019 BDC. You can see the Storage, Data and Compute pools as well as the SQL Master instance.

Querying SQL Server 2019 BDC
For this section, we will use Azure Data Studio with the SQL Server 2019 extension which let’s us connect to both the SQL Server endpoint as well as the Knox endpoint for HDFS and Spark.
Working with HDFS
First, we will put some data into the Big Data cluster. Let’s retrieve the Knox URL for HDFS.
$ kubectl get service service-security-lb -o=custom-columns="IP:.status.loadBalancer.ingress[0].ip,PORT:.spec.ports[0].port" -n $CLUSTER_NAME
Using this URL, we can build the WebHDFS URL and use any HDFS client to connect to the file system.
https://<service-security-lb service external IP address>:30433/gateway/default/webhdfs/v1/
You can follow the guidelines in the Microsoft docs using curl.
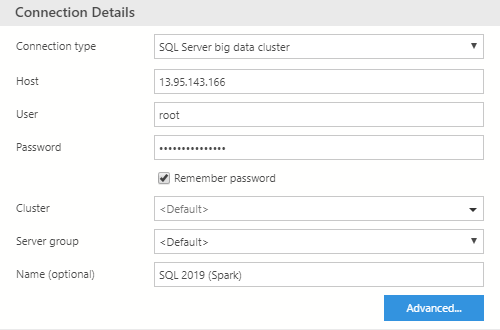
You can as well use the integrated HDFS explorer in Data Studio. To do so, you must create a new connection in Data Studio and select SQL Server Big Data Cluster. I recommend to use the user root in order to have read/write access in all directories. The configuration should look similar to the following picture.

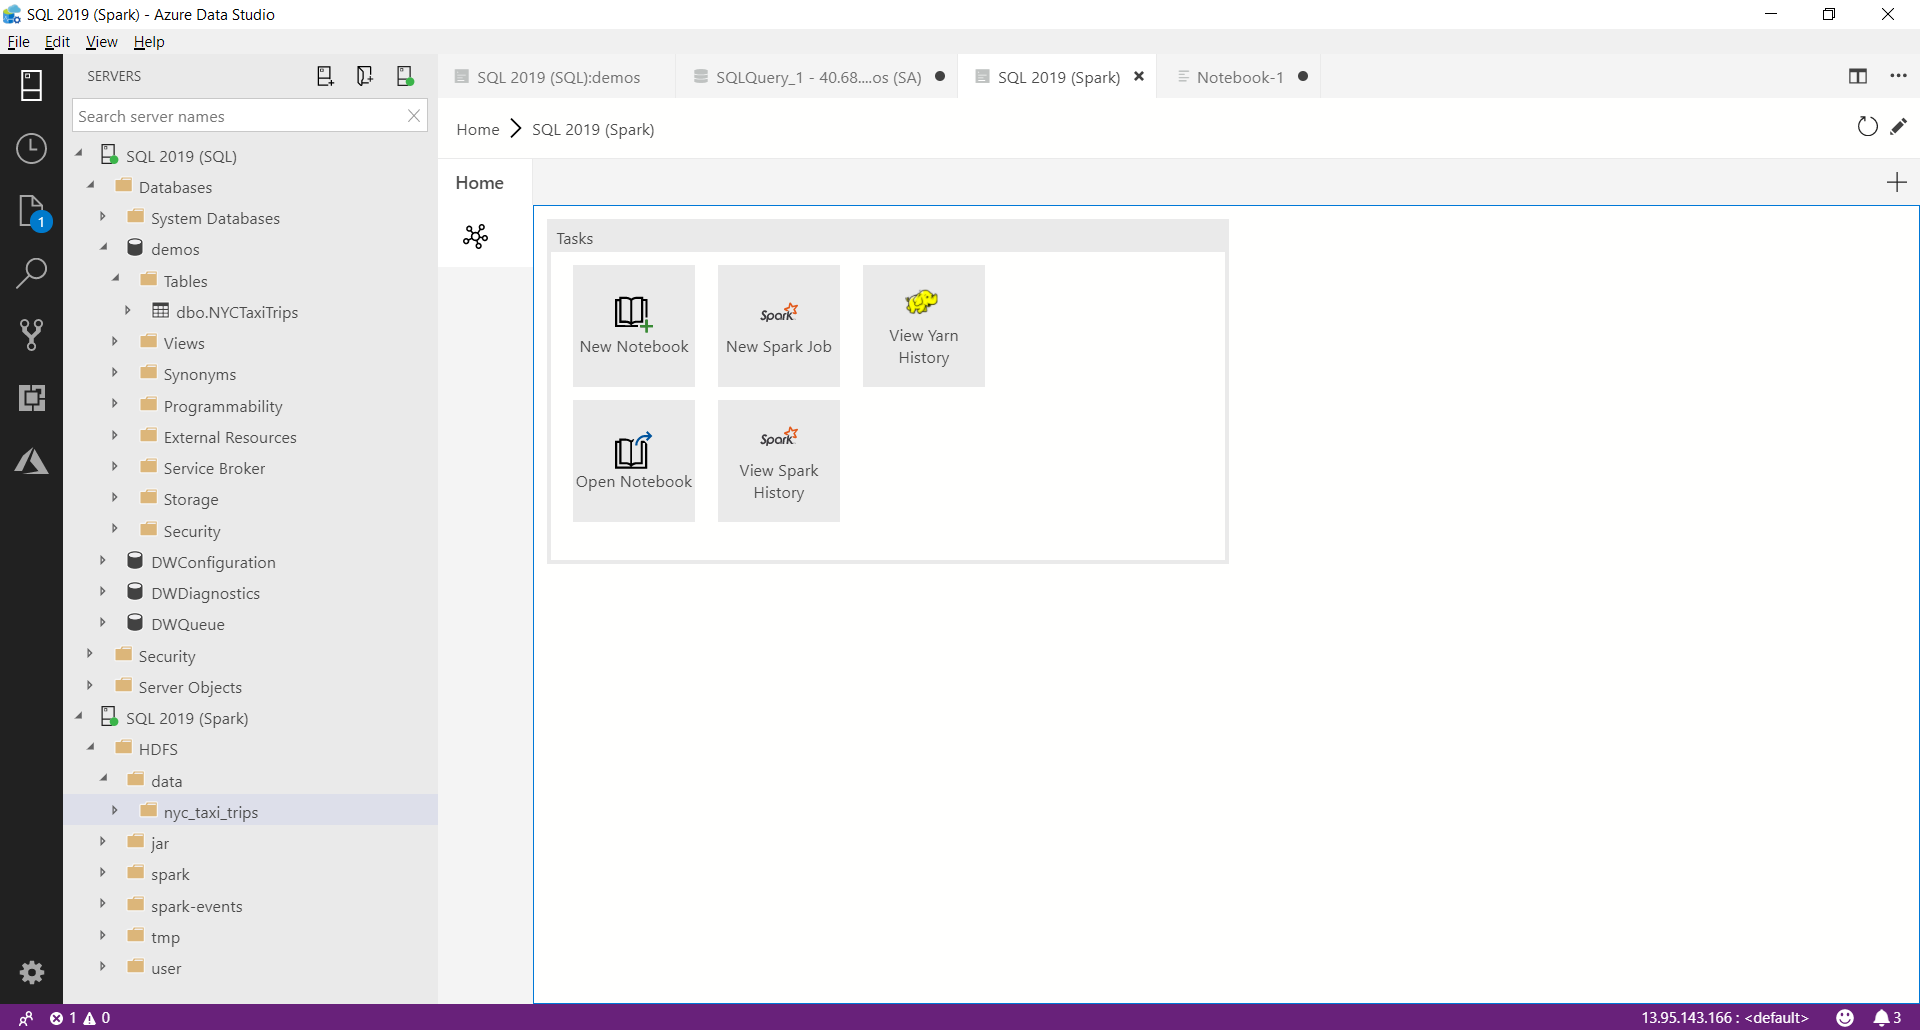
Once added, you should see the server and the HDFS directories in Data Studio.
)](/images/sql2019/connect-data-services-node.png)
In order to query the HDFS data from SQL, you can configure external tables with the external table wizard.
Working with SQL
To work with SQL in SQL Server 2019 BDC, we can simply connect to the SQL Server Master Instance. This instance is a standard SQL Server engine running behind a load balancer on Kubernetes. You can use als your familiar tools such as SQL Server Management Studio to connect and interact with the SQL Server instance.
To connect to the SQL Server Master Instance from outside the cluster, we need to provide the external IP address of the master instance. You can find the local IP address of the SQL Server master instance service in the Kubernetes Dashboard, under the Big Data cluster namespace under services under the name endpoint-master-pool as property Cluster IP. Alternatively, you can as well print the external IP address using the following command:
$ kubectl get service endpoint-master-pool -o=custom-columns="IP:.status.loadBalancer.ingress[0].ip,PORT:.spec.ports[0].port" -n $CLUSTER_NAME
As I said, it is just a normal SQL Server engine like in SQL Server 2016/2017. Hence, you can connect to the SQL Server endpoint using standard SQL tooling such as SQL Server Management Studio or Azure Data Studio. Since we will use Data Studio as well for Spark notebooks and HDFS, we will connect using Azure Data Studio.
Create a new connection and select connection type Microsoft SQL Server. Use the username sa and the password you set in the setup script.
The following screenshot shows a query over an external table storing data in HDFS on the same cluster.

Using Polybase, you can as well setup external tables to many other relational data sources, such as Oracle and SAP Hana. Using the external table wizard in Data Studio this connection is easy to setup.
You can find many more demos for SQL Server 2019 on Bob Ward’s Github repository.
Working with Spark
To work with Spark in SQL Server 2019 BDC, we can leverage the notebook capabilities of Data Studio. Once we connected to the Big Data cluster, we will see options to create Spark notebooks for this instance.
In the current version, the credentials from Spark are not yet passed to the SQL engine automatically. Hence we have to supply a username and password along with the local database host to build the JDBC connection string. Here is a simple PySpark script to connect to the SQL Server database from within Spark.
To connect to the SQL Server Master Instance from Spark from within the cluster, we need to provide the local IP address of the master instance. You can find the local IP address of the SQL Server master instance service in the Kubernetes Dashboard, under the Big Data cluster namespace under services under the name endpoint-master-pool as property Cluster IP. Alternatively, you can as well print the internal IP address using the following command:
$ kubectl get service endpoint-master-pool -o=custom-columns="IP:.spec.clusterIP,PORT:.spec.ports[0].port" -n $CLUSTER_NAME
host = "<local_ip_address>:31334"
database = "demos"
user = "sa"
password = "<sa_password>"
table = "dbo.NYCTaxiTrips"
jdbc_url = "jdbc:sqlserver://%s;database=%s;user=%s;password=%s" % (host, database, user, password)

df = spark.read.format("jdbc") \
       .option("url", jdbc_url) \
       .option("dbtable", table) \
       .load()

df.show()
The following screenshot shows the above query executed on my SQL Server 2019 BDC instance on the NYC Taxi Trips dataset.

If you need to install additional Python packages on the cluster nodes or configure the Spark environment, you can use the Jupyter magic commands.
I am sure you can see why this is really cool, right? You can easily run your Spark ETL, pre-processing and Machine Learning pipelines on data both stored in SQL and HDFS or any external sources.
You can find many more Big Data samples on Buck Woody’s Github repository.
Summary
SQL Server 2019 Big Data cluster (BDC) is combining SQL Server, HDFS and Spark into one single cluster running on Kubernetes, either locally, on-premise or on the cloud. Using Polybase, one can connect multiple services - such as relational databases and NoSQL databases, or files in HDFS - as external tables. This allows you to have a single cluster for all your SQL and Spark workloads as well as for storing massive datasets.
To setup SQL Server 2019 BDC, one needs to sign up for the SQL Server Early Adoption program and install kubectl and mssqlctl on the local machine. The cluster can be created using the Python installation script. Make sure to clean your credentials and setup rolebinding to access your Kubernetes cluster in the cloud.
Once the cluster is created, one can use Azure Data Studio to manage both SQL Server and HDFS. On top, Data Studio provides Jupyter-like notebooks to run Spark on the SQL Server 2019 cluster.
Resources
- SQL Server 2019
- SQL Server 2019 Big Data cluster (BDC)
- Kubernetes
- Hadoop Distributed Filesystem (HDFS)
- Apache Spark
- Apache Knox
- SQL Server 2019 Early Adoption Program
- SQL Server 2019 BDC installation guide
- SQL Server 2019 BDC installation script
- Kubectl installation guide
- Mssqlctl installation guide
- Azure Data Studio
- SQL Workshops
Thanks to Kaijisse Waaijer.
Updates
- April 01, 2019: Update article to CTP 2.4